Customising Compile Settings on iOS
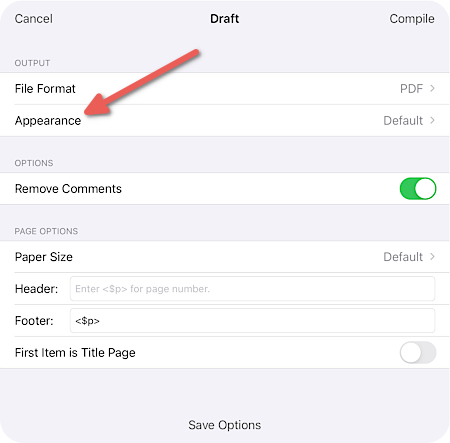
When you go to Compile a project on Scrivener for iOS, you can customise the appearance and formatting of the final document by choosing a Format. To view them, tap the Appearance button, toward the top the main compile dialogue.
There are five formats to choose from out of the box:
- Manuscript (Courier)
- Manuscript (Times)
- Modern
- Palatino Book
- Script
Each of these applies certain formatting options to the text. They may also add titles to sections, and page breaks or separator characters between the files.
You can also set the appearance to "Default". If you choose this, your text will be output exactly as it looks in the editor, save for adding empty lines between each text document and page breaks before folders.
The stock formats provide some nice defaults to get you started, but depending on how you work, they may not do what you want. You can therefore create your own formats, giving you complete control over the output of your text.
Creating Your Own Compile Formats
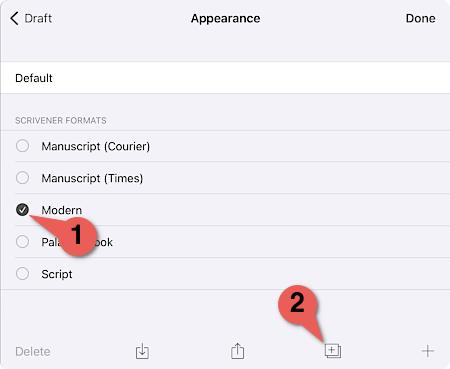
The easiest way to get started with creating your own format is to duplicate one of the defaults. To do this:
- Tap on Appearance under the “Output” section of the Compile screen.
- Tap
Editin the top right corner of the Appearance screen. - Select one of the default formats.
-
Tap the duplicate button at the bottom of the screen (the overlapping squares with a "+" on them).
-
Select a location for the new format
- On my iPad | Dropbox: make the format universally available to all of your projects, and if you sync with Dropbox, to all of your devices as well (they will be saved with the .scomp extension).
- In Project: the format will only be available for the current project.
The "Appearance Editor" will appear. You'll see that this contains lots of easily readable text describing the current format, such as:
Title: Modern
Author: L&L

Default Font Family: Avenir
Default Font Size: 12

Text Format Overrides:
  Line Spacing: 1.2

Document Separator: "#"

Document Breaks:
- Page Break Before Folders
This text is actually in the YAML format. It's a format that is designed to be easily written and edited by non-techies. The above example first describes the format as it will appear in selection lists, and then tells the compiler that it should:
- Use "Avenir" as default font for the document.
- Set the document's default size to 12pt.
- Modify text content to use a 1.2 line-height.
- Add a hash ("#") between text files.
- Add a page break before folders.
There are a whole raft of commands available so that you can completely change how the text looks in your exported or printed document. You can see a full list of available commands by tapping the question mark next to the "Done" button at the top right of the Appearance Editor. The help text is itself valid configuration text, so examples from it can be copied and pasted into your format. Comments---anything typed after a # sign---will be printed in blue, and will be ignored by the compiler.
Some of the provided formats include instructions on how you might edit them for different project structures, too. For instance, if you duplicate "Manuscript (Courier)" or "Manuscript (Times)", you will find comments telling you how to adjust the templates so that they will add chapter numbering for different types of project.
Editing Formats
To edit a format you've created or installed into the app:
- Tap
Editin the top right corner of the Appearance screen. - Tap the circled
ibutton to the right of the format you wish to edit.
Examples
Markdown Example
Scrivener can be used to compose text using the Markdown writing convention, as any text editor can. The following would be a simple format to use for exporting to Markdown, with the title included for every level of the binder (well, up to eight levels, anyway):
Title: Markdown
Author: Ioa Petra'ka

# Apply Markdown headings to all folders, respective to their indent level.
Folder Titles:
  Level 1: '# <$title>'
  Level 2: '## <$title>'
  Level 3: '### <$title>'
  Level 4: '#### <$title>'
  Level 5: '##### <$title>'
  Level 6: '###### <$title>'

# Top level text items will have a title, but all other items nested at lower levels will not.
Text Titles:
  Level 1: '# <$title>'

# Some Markdown editors do not work well with typographic punctuation.
Transformations:
- Dumb Punctuation
Example of Changing the Font
The following Appearance template does the following:
- Changes the font used throughout the exported or printed document to Cochin.
- Includes titles for folders up to four levels deep in the binder.
- Inserts a page break before each folder.
- Sets 1/2 inch margins all around except for the right margin, which is one inch (margins are measured in points; there are 72 points in an inch).
- Turns on facing pages. With facing pages set, you can choose a different header and footer for left and right pages, and the one inch margin will alternate between left and right pages.
Title: Cochin Document

Text Format Overrides:
  Font Family: Cochin

Folder Titles:
  Level 1: <$title>
  Level 2: <$title>
  Level 3: <$title>
  Level 4: <$title>

Document Breaks:
- Page Break Before Folders

Margins:
  Left: 36
  Right: 72
  Top: 36
  Bottom: 36
Facing Pages: Yes
There's much more you can do, including creating a template to export in standard manuscript format (the two "Manuscript" default templates can easiliy be edited for that). Feel free to experiment!